We are grateful for our lovely followers

Follow on Bloglovin

Google Website Translator Gadget

Monday 28 June 2010

Challenge #24 - Inky Fingers

Wow thank you for another fantastic amount of entries for our mens cards challenge! We're still doing our rounds as we've had a huge amount of behind the scenes on this week so we'll catch up very soon so dont worry if you've not had a visit yet, you will! Thank You also to Sandy Hulsart for being our Special Guest and Sheila for guesting.
********************************
CHALLENGE 24 - INKY FINGERS


Oooh my favourite!! Our challenge to you this fortnight is to use ink/stains/mists of some sort on your design. You can keep it minimal such as edging around your card or really go to town and make backgrounds. Although promarkers and copics are ink they'll only be valid if you do something other than colour your image in with them such as colouring flowers or ribbons to match or making your own backgrounds.

We are sponsored once again by The Stampman who are offering a £10 voucher for their store. There is such a wide variety of products to choose from and now free P&P is back!
Thank You Stampman (and lady!)
A quick note also that The Stampman has reopened their very popular ATC swaps and have some candy on offer - pop over to their new blog for details!

Here's what the girls have made! Our newest members will be starting from the next challenge so they've got a chance to find their way round and think "Oh dear what have I got myself into" hehe! Lin has actually submitted one as it was in progress and fitted perfectly so she's jumping on board today!


GUEST DESIGNER - PAULINE


I started with by stamping La Plume from Clarity Stamps in VERSAFINE VINTAGE SEPIA and then coloured it with WHISPERS PENS (using the watercolour method). I then mounted her onto gold card and then a background I had made using ALCOHOL INKS (Lemonade, Butterscotch, Shell Pink and Copper). The background paper is from K&Co called LJ Letters. On top of the bg paper I added a strip of pink card that I ran through the cuttlebug using the script folder and then inked it up with DISTRESS INKS (Tattered Rose and Antique Linen) and then wrapped a ribbon round the strip (curly ends inspired by Vix). The roses are from my stash and the leaves are punched.


For this card I've used Sailboat, Pool & Silver Adirondack alcohol inks on glossy card to create the "splodgy" sea & sky background by simply adding a few spots of each colour on the applicator tool. The image is a digi from Tiddly Inks coloured with ProMarkers and mounted onto the background with foam pads, the tree has been stamped out again & decoupaged. The whole image has clear Sakura & glitter-glue highlights.

Judie
I have used a variety of inks to get this and a whole lot of mess lol - I used Sir Tims distress inks to ink up the card first, double embossed on my lady from Dimension fourth - Masked her off and stamped the writing stamp in the background, used sticky fingers gold to bring the whole card alive !!!, i used a little tiny stamp with small holes in to make a border, and used the alcohol inks to swipe the lady and then added gems and feathers. The flower is one I made ages ago.

Julie


I have used a momento ink pads, silver and lilac and spread the ink over black textured card for the background, the used the same lilac ink on the next layer mounting on silver mirror card. The stamp is from Anita's and I have stamped it with same lilac ink again. I have added the flower embellishment to the corner as it just needed something to finish it off.


The background is Kanban paper. The image was made by sponging on Sir Tim's lovely distress inks in Stormy Sky and Mustard Seed, a few drips of water for effect and I then overstamped an Elusive Images peacock stamp. It didn't stand out enough though so I went to town with some Starbust Stains to colour in the feathers, and used a combination of Hydrangea Blue, Jack in the Pulpit Teal, Wisteria Purple Blue and Marigold Yellow Orange. I matted it onto some glitter card in a toning colour, and added a little peacock embellishment. Sadly it was pink! Whoever heard of a pink peacock. I tried to re-colour it but the best I could get was a shade of purple.

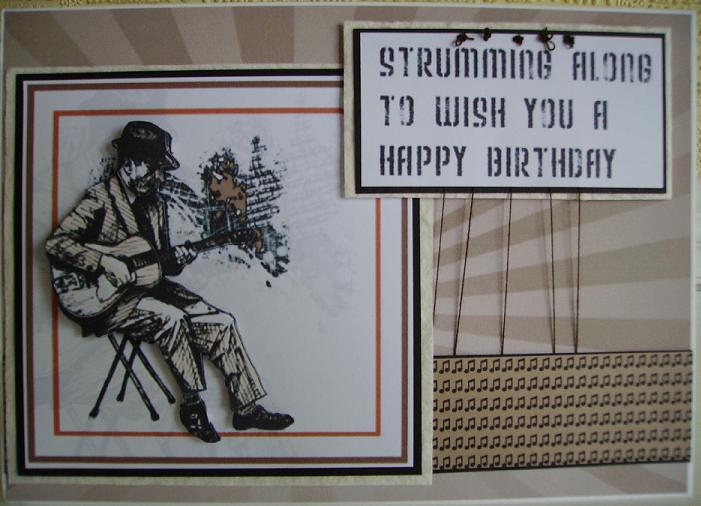
It hasn't come out too well in the pic but in the top right corner I stamped three peacock feathers. Had to avoid too much fuss cos it's for a bloke who likes birds, and yes I do mean the feathered variety!


I've used an image from Digistamp Boutique, coloured with promarkers. The papers are K&Co Wild Raspberry, with coredinations cardstock and a small amount of pink spotty Doodlebug (for the flowers). The flowers were cut with a Nellie Snellen punch, with flat back pearl centres added. MS doily lace punch used for the borders, and a computer generated sentiment. Pink papers and flowers were edged with distress inks in Tattered Rose and Worn Lipstick, yellow papers and flowers were edged with Antique Linen.

For the latest challenge I have opted to used my tried and trusted Tim Holtz pad to do some distressing. I lad been given a load of greetings cards to recycle and found this fabulous foiled tree and leaf border. I used the distressing pad to rub over the tree to help define the embossed texture and also on the edges of the papers and card blank. The Hampstead papers from Papermania are perfect for this as the colours are autumnal. The mat is a Nellie Snellen frame which has been edged in gold pen and last but not least I used 2 colours of ink to darken the Docrafts 'scrabble' letters as they were a bit too clean looking and didn't suit the card.

Toria


The image is a Hanglar and Stanglar stamp. The image is stamped in Memento Ink and coloured with Copic's.
I used starburst stains to create the turquoise tissue paper background. I created the flower from parchment paper and coloured it with chalk to give it a subtle colour of blue. I created the bead pins and added leaves to finish the arrangement. The patterned paper is a freebie from a magazine and decided to use black to emphasize the starburst stain background.

For this challenge I was going to use alcohol inks but whilst rummaging in my cupboard I spotted some posh impressions metallic inks I've had forever so thought I'd dust them down and give them a run out! I made some pretty backgrounds by dropping some ink onto a craft mat and placing a piece of glossy card over the top, let dry then stamped and embossed the starburst fairies. I've also inked the corners of the card with worn lipstick distress ink and overstamped with brilliance pink. More details on my blog.

***********************************

Most of us will have a certain crafter that provides inspiration and influences how they develop their own styles of creation and I'm no exception. When I first started cardmaking I started with the usual peel offs and printed decoupage not really giving stamping much thought until I saw a wonderful designer in cardmaking and papercraft magazine most months. Her work really stood out because of the colours she used and the style of her work. I often found stamping to be quite grungy so this kind of stamping which looked pretty really appealled. I could spot her work in whatever publication a mile of so if anyone ever asks who are my influences I'll always respond Kim Reygate and Cath Wilson.

Fast forward a few years and I was stood with Jill from The Stampman at a show and one of the ladies there who I see everytime I go the show came over to the stall. I laughed to Jill how everytime I saw the lady I thought it was Kim Reygate, Jill was very amused to inform me she WAS! Kim probably thinks I'm a mad stalker now mwhahaha!

Kim is a many times published designer in various publications and has written 2 books - her rubber stamping book is the only craft book I actually bought and own! Her stamping book is here and her tea bag folding one here.

So may I have the absolute pleasure of introducing our Special Guest for this challenge - Kim Reygate!


This is Kim's Stash Room (PART of it!) Pop over to Crafty Storage blog to have a look at the rest! I think we can safely tell our OH's that we dont have nearly enough stash lol!

Pop over to Kims Blog to see her write up on this creation and say hello!


Questions for Kim

1. Judie has seen your craft room (hugely impressed!) And would like to know how do you organise and store your inkpads. Also fav brands?

1, I have Billy bookcases in my craft room, and they have a CD section in them which is just brill for inkpads,I love any dye based inkpad but my favourites are probably the distress ones - of course I have them all lol.I also keep them in plastic boxes now as well which makes it easier when I am off to a show or demo.When it comes to storing them, as far as I am aware upside down is right for most but not all dye based inkpads.I learned this tip about 14 years ago when I first got into stamping, but I learnt the hard way that it is no good for multicoloured inkpads like Big and Juicy or the multicoloured Adirondack. Storing them upside down means that gravity takes over like it does with the rest of us and everything sinks to the bottom lol. This is fine with the single coloured pads but with the multicoloured ones the inks all merge into one another ruining the pad. Hope this helps Judie.


2. Toria would like to know where you get inspiration?

Toria - Inspiration can come from everywhere. I have been known to scribble a sketch on the back of a receipt at work if something catches my eye. It might be a piece of jewellery, a T-shirt or even a handbag, any thing can spark an idea.When I sit down to make a card I could no more tell you what it is going to look like than I could fly to the moon. Sometimes its just a happy accident which comes about from the left over pieces from a previous project.If ever I am really stuck for inspiration then I just turn to my old catalogues and magazines. There is always something in them that will spark an idea be it a layout or a colour combo.And then of course there is always the Internet with all the wonderful blogs out there jam packed with inspirational ideas.


3. I would like to know about demoing, do you get nervous, have you had disasters (and did anybody notice!)

I love to demo, it always gives me such a buzz. I do still get nervous occasionally, but that usually disappears as soon as I get started. Of course things go wrong, but that's the great thing with it it gives you the chance to show everyone that we are all human and fallible. There are very few people who are instantly good at things, we all have to practise and sometimes things go wrong. Like you one of my major disasters came from shrink plastic. I was showing everyone how to make a ruler - its a brilliant idea and the one I made at home worked like a charm but everyone I made on the class went wrong!!!!!!!!!!!!!

4. Future plans? Any plans for any more books?

When it comes to new books I guess its a case of never say never but I would have to be asked to do it. It is not something that I would be able to do by myself, and at the moment I haven't been asked :)For the future I would just like to continue having fun with my crafting. I have absolutely no desire to work in the Industry full time, I like being able to do as much or as little as I want. How many shop owners do you know who never get the time to play with all the brilliant products that they sell. I love doing what I do and if I only come home from a class or a show with new toys then that fine by me. Who needs new clothes anyway lol

5. Your top 3 tips!

Probably my TOP top tip is don't be scared. Remember it's only a bit of paper and ink and a little bit of your time. Just because it may not turn out quite as you expected doesn't make it wrong. There are almost no wrongs in crafting - just play and have fun.

Top tip number 2 would have to be the part peel tip with DSST.(Don't take all of the backing off your DSST. Fold part of the backing to form tabs which stick out the sides of the panel you are trying to stick down. When the panel is located in the correct place press down and remove the rest of the backing tape)When I was teaching at the Craft Barn many years ago one of the tutors showed us this and I have used it ever since. The pieces of card stock that I have saved over the years since I learnt this must have saved me a fortune - which I have spent on DSST. I get through rolls of the stuff. I can easily use one in a day when I am prepping a class!!

Top tip number 3 is actually a piece of spaghetti. No seriously folks you just have to have a piece of spaghetti in your craft box - uncooked of course. My friend Anna showed me how to moisten the end of it and then use it to pick up crystals and gems to attach them to a blob of glue on a card. Its just brill. I wouldn't be without it. Its such a cheap piece of equipment and the rest of the pack makes a nice spag bol.

Thanks Kim :)

Sunday 27 June 2010

Our new design team & some changes!

Here I am again to introduce the latest additions to our brood! We had a very good response of nutters wanting to join us so it was extremely tough to decide. Much nailbiting later we've managed to nab the following to join us from Monday 12th July....

Fiona - Handmade by Fiona
Dionne - Deez Creative Designs
Kat - Lilackat
Josephine - Josephine's Rainbow
Jenni - Jenni's Crafty Journal
Lin - Twisted Witch
Melly - Mels Craft Room
Corry - Free 4 Ever
Ei - Eiglas
Cath - Inky Fingers

Hope you can give them all a warm welcome to the team! Thanks for joining us girls!

Next up some changes, not a little tweek but a HUGE overhaul!
This blog is originally designed as a learning resource aimed at newbies and to show hints, tips, tutorials whatever we can do along the way. After much turning of the cogs I decided we are now going to go weekly BUT with a difference - well it wouldnt be CCM if it wasnt a bit different eh!

From Monday 12th July we will start with a regular challenge as normal - still with 2 weeks to play but the following Monday we will be running the Spotlight Zone where we will focus on a technique, style, product etc to give you ideas on how to use or make a particular thing. These are not sponsored nor is it a competition, its to give you somewhere you can just simply play along and try things out, ask us any questions. The team will also follow the regular challenge too, you can if you wish but simply doing whatever is spotlighted is fine!
Sounds complex ybut you'll understand it when you see it lol!

This is also the reason we've gone for a bigger team so there is a good mix of skills on the team so we can cover practically anything!

Our latest challenge starts tomorrow so dont forget to pop back as we have cardmaking royalty in da house again oooooh!

The newest members of the team will be starting with us on 12th July with the next challenge :)

Winners of Challenge #22 Least & Most

We're back with the winners of Challenge #22 sponsored by Stitchy Bear stamps! A quick Thank You to Rachel for being our guest designer and Cheryl for being our special guest! It was a fun challenge with ORANGE being a very clear least lol! Our Jane wants to start an orange campaign to get people to love it more - that might just be a future challenge, you know what we're like here!

The froggy has chosen and our winner of own choice of 3 of stitchy's fabulous stamps is....
71 - Nina Macauley Well Done Nina, please contact me to claim your prize :)

Onto our Fabulous Top 5


Jude


Val


Well done ladies, beautiful work! Please grab your Top 5 blinkie off this post!


I'll also be back a bit later on with our new team announcement as they have been chosen!


Sunday 20 June 2010

Design Team call - We're hiring!

DT Call is now closed. Thank You to all the applicants, we are going to spend this week visiting you all and will contact you if you are successful.

New DT will be announced in a week along with some ch-ch-ch changes!

Vix

Saturday 19 June 2010

Winners of challenge #21 Inside Out

We're back with our winners of Challenge 21 - Inside Out, what stunning work girls! Thank You very much to Joanna Sheen for sponsoring us and to Susie Sugar for being our fabulous special guest! Just trying out the new froggy linky pick a winner thingy ma bob lol! Ah yes there it is, its chosen The winner is: Kym's Crafty Cards

Well Done Kym, please email me with your details to pass onto Joanna x


Onto our Top 5 picks for the Inside Out challenge! What fantastic ideas, well done to you ALL who played!

Monday 14 June 2010

Challenge #23 - Cards for Men!

Thank You for you entries for our previous challenge Least & Most, I see some of you really had fun with this one and some fabulous colour schemes coming out. Orange seems to be like marmite, you love it or hate it lol! We do like to stretch you and your imagination a bit here!

We're still doing our rounds so will get to you all soon as we've all been a bit busy lately but we will get round you all and leave a comment! I'm also a bit late with our Top 5 and winners post for challenge 21 due to having 2 poorly ick ick toddlers as I normally get time on the PC in the evenings this hasn't happened so I will catch up very soon!

We've received quite a few DT applications, don't worry if you haven't heard anything yet I will send you a reply before the close date. There's still time to enter the DT call which is open until the 20th, simply email me your blog addy, no need to send pics as we'll look on your blog :)


Thanks also to Stitchy for sponsoring our previous challenge and to Cheryl for being our special guest.

*************************
CHALLENGE 23 - CARDS FOR MEN!
Eeeeeeek!!! Oh yes, its a necessary evil at some point! Its Fathers Day in the UK soon so will tie in nicely for that. It doesnt have to be for Fathers Day it can be any occasion - for a male (including kids and babies!) By the way if you didn't already know there is a challenge blog specifically for mens cards! You'll find Cards for Men blog here!


We're sponsored again by Joanna Sheen who is offering a £10 voucher! She has numerous male themed items in her online shop including cd-roms and stamps. There are some fabulous new african themed ones available now too!

Thank You again for sponsoring us Joanna :)

Onto our challenge! Lets see what the girls have come up with. Janey is also making her debut as a fully fledged DT member so I hope you'll leave her a comment to welcome her to the brood! Sheila is also joining as a guest for this challenge and our Special Guest is Sandy Hulsart.


It was made using an image from My Craft Studio which I decoupaged; matting and layering done with black card and thick handmade card from stash; musical note paper made in Word and guitar strings made with thread (well I thought they looked like strings!).


Found a really great origami shirt pattern and used papers from the gorgeous Basic Grey Cappella collection to create mini versions and a background. I've added tiny pearl gems for buttons & mounted onto white cardstock with rounded off bottom corners. The message is simply a black peel-off which covers a variety of "Manly" occasions.


I used a orange card and using dst I added a piece of a local map which I had downloaded from the intenet. I then took several photo's of an ornamental Morris Minor car which we have & using a thicker dst added two cut outs of these to the front of the card.


I swiped a green distress pad three times across and 3 times down, then sprayed with sticky fingers gold, scrumpled it up and swiped the raised parts with the soot distress pad. I then choose a bird cage stamp, stamped in both black and green, couldnt decide so went with both, added a bird and some branches which I layered up with greens and browns and some embossing powder to give a shine. This card is for my daddy who loves birds flying around and not in cages. But Mens cards are so hard aren't they ?


Julie


For this challenge I went back to basics, decided to do an easel card, I made the easel blank card out of two square cards, the background paper and sentiment I printed myself onto card. The paper I used was from a forever friends pack as was the image. I added the flower and gems to finish the card off. The gems I added on the bottom help the card stand as it should. Just think it shows what simple matting and layering with papers can create.


Lisa


More details on Lisa's Blog

Mandy


The card for this challenge was made to celebrate the 65th Birthday of a special friend. I have used the Hampstead range of papers by Papermania, cut mats using Nestabilities dies and used a new embossing folder by Indentz, distressed the text and inked over the top and around the edges with a Tim Holtz distressed ink pad.

The decoupage is a Forever Friends bear which has several layers. The chipboard numbers have stickles glue added for a bit of bling and the sentiment was recycled from an old greeting card. As the recipient is a gardener for his living I have used FF stickers inside to make it more personalised.


I decided to create a card and gift for my dad for father’s day. I created a 3D scene using a boat and stamped Pirate images. I created a matching easel card, using a patchwork background of patterned paper and added a boat in the centre. I added another pirate and as well sea scene at the bottom. The text is computer generated and I have added some glitz to the text.
Stamps used:
• Captain Edwin with Sword, Pirate Edwin and are from Magnolia Fairytale collection
• Pier Background Scene from Magnolia’s Lazy Summer Days
• Boat is from Cute Companions – Summer Stories – Sun and Fun
Papers used:
• Boat and Shell papers from Cute Companions – Summer stories outdoor CD
• The Text and clouds are free from http://melstampz.blogspot.com/


This is really challenging for me, I haaaaate man cards lol! I thought I'd keep things simple and went for a simple stampscaped scene over alcohol ink background which I stippled on and then dropped some droplets of ink on and some blending solution. Its done on plain linen card so has some texture. I've added some glaze to the water and given it a spray with iridescent gold glimmer mist for a shimmer rather than a sparkle :)

May I introduce our Special Guest for this challenge, Sandy Hulsart! Sandy is a chameleon of crafters and has such a massive range of style you never know what is coming next. One minute its cute, the next is a beautiful classical style or a scenescaped card. She helpfully provides recipes for her creations on her blogs, she has two! Both are definately ones for the following list so please do pop over to Creative moments with Sandy and Scenes by Sandy for a real treat!


SPECIAL GUEST DESIGNER - SANDY HULSART FROM CREATIVE MOMENTS WITH SANDY AND SCENES BY SANDY


Hi, my name is Sandy Hulsart. I am honored to have been asked to guest design with Crafty Cardmakers today. I love making guy cards, not much of a pink kind of gal.
I have always been a crafty person; watercolor, oil painting, pen and ink, machine embroidery, picture framing. I have tried almost everything, I began rubber stamping the summer of 2005 after seeing a Stampscapes scenic card in a RSM magazine. I was blessed to have a wonderful stamp store in my tiny home town in mid-Michigan and I learned a lot from the owner. It was not long before I was designing and teaching classes. The summer of 2007 I was introduced to Copic markers and I was in love. I have always loved to color and these are heaven. I became Copic Certified the following year shortly after retiring from 35 plus years in Telecommunications. I now teach both Copic and Scenic stamping classes in Michigan as well as online classes at My Creative Classroom.


I am currently on four Design Teams; Karen's Doodles, Mo Manning, BugABoo and ABC as well as maintaining both a stamping blog, Creative Moments with Sandy and a scenic blog, Scenes by Sandy. My past design teams include Dog Gone Stamps, Repeat Impressions, Simon Says and Stamps and Smiles. I enjoy design team work, it is great fun to participate and share with a team of like minded individuals.


My scenic work has been published in 4 issues of Rubber Stamps Madness as well as their Album of Scenic Art published in 2009. I encourage everyone to submit their cards for publication. It is quite a feeling to see your name in print. And yes, I have been turned down many times, but it only takes one publication to make you forget all those declined cards.


I am very excited that digi stamps have appeared in the crafting world. I just love them for their ease of storage, the fact that you can now have that perfectly sized image and instant downloads. And I love combining images using Adobe Photoshop Elements to make my own little vignettes.
My first card for today is a digi image from Karen's Doodles. I measured my Spellbinders die and then sized the image accordingly. I then printed it onto Cryogen paper and colored it with my Copic markers.


My second card is a Photoscape; a scene that has actually been stamped on a photo. I took this picture of a sunset over my house. I turned the photo upside down, so the blue of the sky is down and the setting sun is up. Then I simply stamped my image, added a bit of color to the mill and grass with water based markers and instant scene. These make fabulous guy cards although most women I know love them too.


Vix asked me what I get out of creating...let's see, affirmation and recognition, great cyber stamping friends, design team perks, and the thrill of taking a blank piece of paper and creating wonderful works of art! Oh, and sharing my knowledge and talent with new friends around the world. What more could you ask for! It is a great way to spend my retirement. Thanks again for having me.


Thank You Sandy for your inspirations and sharing your wonderful work :)